DIY Firework Lashes

Materials:

  • Artificial lashes of your choice (I used Dodo Lashes, style D115).
  • Cosmetic grade glitter.
  • Glitter adhesive (I used Sprinkles Glue from Beauty Bakerie).

Process:

  • While leaving your lashes in their tray, brush a third (or however much you are wanting for your first glitter) with glitter adhesive.
  • Repeat the process with the rest of the lash.
  • After the tops have dried fully, gently remove them from their tray, and repeat the process with the bottom side of the lashes.
  • Once both sides have dried, you are ready to apply.

To see the final result, check out my Instagram @allthingsadoredofficial

Thanks for reading and have a great 4th of July! 🤗

Tree Hut Shea Sugar Scrub

Voted one of Allure’s Readers’ Choice winners in 2016, the Tree Hut Shea Sugar Scrubs are definitely worth trying out; especially if you are looking to get your skin summer ready. 

The shea sugar scrubs come in several different scent combinations, including: Coconut Lime, Marula & Jasmine, Moroccan Rose, Brazilian Nut, Tropical Mango, Pomegranate Acai, Hawaiian Kukui, Passion Fruit & Guava, Lychee & Plum, and Original Shea.

I have tried the three pictured above, and would absolutely repurchase them. It is a very gentle scrub that exfoliated very well and leaves your skin feeling very soft and moisturized. 

The application is simple and self-explanatory. You just scoop out the desired amount of product into your hand and apply in a circular motion to the area of the body you want to exfoliate. The sugar disintegrates as you scrub, and moisturizes your skin. Once you’ve scrubbed enough, rinse with water. I usually use this product while I am in the shower, after I have washed with soap.

So where can you pick up these scrubs to try out for yourself, you ask. Ulta has a large selection (actually I think they carry every single version), and they often have a two for one, or buy one get the second 1/2 off deal. But for the regular price of $7.99 (18 oz.) you are still getting a great product for an inexpensive price tag. I have also seen them for sale on Amazon and at some Bed, Bath and Beyond stores.

Thanks for reading! ☺️

DIY False Eyelash Cleaning


The bane of my existence… cleaning my eyelashes! But I have discovered a new method that makes this whole process less tedious.

What you’ll need:

  • Your used false lashes 
  • Rubbing alcohol (I use 70%)
  • A small dish or bowl 
  • Original eyelash tray that your lashes came in

The process:

  • First place your lashes into a small bowl/dish.
  • Next, pour rubbing alcohol into the bowl/dish until your lashes are completely submerged.
  • Leave them soaking for a few moments.
  • Next, gently remove mascara and glue with your fingers.
  • Once clean, place the eyelashes back in their original tray to maintain their shape.
  • That’s it!

Happy cleaning!! 🙂

    DIY Painted Canvas Shoes

    Materials You Will Need:

    • A pair of canvas shoes
    • Painter’s tape
    • Acrylic paints
    • Paint brushes

    Step 1:

    Tape off the toe and front edge of each shoe to ensure paint does not go anywhere that it is not wanted.

    Step 2:

    Paint a base color in the taped off area. It can be any color, as it will serve as the background for everything else you paint. You will want to paint two or three coats of your base color to ensure complete coverage.

    Step 3:

    Remove painter’s tape. Let base coats dry completely before next step.

    Step 4:

    Choose an animal or person’s face that you’d like to adorn the front of your shoes with. I chose a wolf/fox/coyote type animal. 

    Start with painting the front silhouette shape of your chosen animal or person (see above).

    Step 5:

    After the silhouette has completely dried, you will add in the facial details (eyes, ears, nose, mouth, etc.). Remember to let each layer of paint dry.

    Happy creating! 🙂 If you have any questions or troubleshooting, please let me know. Thanks for viewing.

    DIY Makeup Brush Cleaner


    Materials:

    • 2 cups of warm water
    • 1 tablespoon of dish soap (I use Dawn)
    • 1 tablespoon of distilled white vinegar
    • A glass

    Directions:

    Mix the above ingredients into a glass. I start with the warm water, so I don’t get an overwhelming amount of bubbles in the final mixture.

    Once mixed, add your makeup brushes (brush-side down obviously) and let sit. I usually let mine sit for about 20 minutes.

    At the end of the 20 minutes, I swirl around each individual brush in the mixture before removing it from the glass. Next I place each brush under a running faucet (warm water).

    After each brush is fully rinsed and the water is running clear, I lay them down on a clean towel or washcloth to let air dry.

    I’ve used this process time and time again. It works great and is very inexpensive.

    Give it a try and let me know what you think or if you have a brush cleaner that you love and adore, please share below! 

    Happy cleaning!! 🤗

    Essie Nail Polish – Ballet Slippers

      
    I know I’ve sang the praises of Essie nail polish before, but in the honor of Spring and of all things in a beautiful blushing shade of pink I wanted to do a special post on the new color I recently added to my Essie collection. Ballet Slippers is GORGEOUS!!!! It is a beautiful neutral shade that looks good with everything. Definitely my new favorite shade.

    If you haven’t tried any of Essie’s products, please do! If you’d like to hear me rave more about Essie, please see my previous blog post.

    Essie Nail Polish | All Things Adored

    http://allthingsadored.net/2016/02/01/essie-nail-polish/ 

    Happy Nail-Polishing!! 🙂

    DIY Lip Scrub


    With the weird weather we’ve been having lately in Southern California, I decided to take advantage of one of the rainy days and make myself some lip scrub. 

    You can find a ton of DIY recipes on Pinterest for these, varying in tastes, aromas, textures, etc. 

    I opted to concoct my own recipe because I didn’t want to have a bunch of leftovers. So this recipe (below) will probably make you enough lip scrub for approximately 4-5 applications.

    First let me mention that this lip scrub is completely edible, smells amazing – kind of somewhere between an Orange Dreamcicle and an Orange Julius, and it leaves your lips feeling soft and exfoliated afterwards.

    The Ingredients:

    • 2 teaspoons of organic cane sugar
    • 1/2 teaspoon of grapeseed oil
    • 3-4 drops of vanilla extract
    • 3-4 drops of orange extract

    The Process: 

    • Mix all ingredients together in a small bowl.

    Once you’ve got your ingredients all blended together, simply apply a small to liberal amount to your lips and rub in a circular motion for about 1-2 minutes. Afterwards either rinse off excess or lick the rest of it off your lips 🙂

    Substitutions can be used for the sugar, depending on how course or fine you prefer the grain to be. Some other options include brown sugar, or sugar in the raw. The cane sugar I used falls in the middle in terms of grain size.

    Happy scrubbing!! 🙂

    If anyone tries it out, please share your experience in the comments below. Or if you have a lip scrub recipe you’d like to share please do so below as well. Thanks!

    Essie Nail Polish

    What can I say about Essie? Seriously I can only say great things! I first became intrigued by Essie because of the gorgeous range of colors that they had available. It is safe to say, it was love at first sight. Since first trying out this nail polish, I have not looked back. The colors are vivid and long lasting, and the polish itself is very resistant to chipping. Yes, it happens here and there, but by far the best polish I have yet to try in terms of value and upkeep.

    Essie products are available most everywhere now, from Target to Rite-Aid. You can also purchase them online and see their full range of color options on the Essie website.

    Some may say that $8-$9 is too much to pay for DIY nail polish, however you really do get what you pay for in this case.

    Photo Information: Essie Colors (top to bottom) – Lady Like, Naughty Nautical, She’s Pampered, Stylenomics, and Mod Square.

    Holy Trinity of Hair Care

    So anyone who has massively color treated hair knows the importance of maintaining a good hair regimen. I am naturally a dark brunette but as of lately I have become a very light blonde (a la Gwen Stefani or Marilyn Monroe type blonde). So keeping my hair strong, moisturized, and healthy is SUPER important. These are the products I use to keep my hair looking smooth and silky. All products are available at Target, for approximately $4-$7 each.

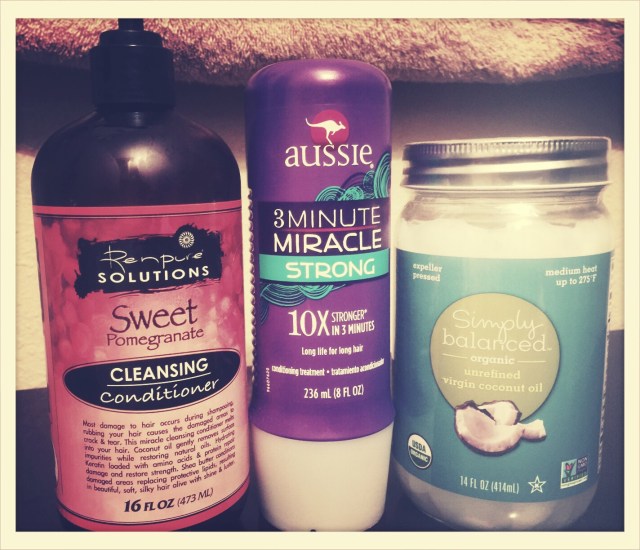
    First the Renpure. It comes in three different fragrances, and all of them are lovely smelling. The “Sweet Pomegranate” is pictured above, but it also comes in a “Rosemary Mint,” and “Lavender.” Renpure’s cleansing conditioner is a product I tried purely out of curiosity, and because I had been reading so many great things about using cleansing conditioners in place of shampoo. Many shampoos contain sulfates which can dry out your hair, this product does not. Also, because of the nature of shampooing (the lathering process), hair can also become dried out. The difference with cleansing conditioners is that it does not lather. This does take a little while to get used to (or at least it did for me). Once you have coated the hair in the cleansing conditioner, let it sit or a few minutes, and then rinse.

    Next the Aussie 3 Minute Miracle. This comes in a few different options as well, they include, “Strong,” “Moist,” and “Color.” I prefer the “Strong” (photographed above) because I just like the smell a bit better than the other types.

    I use this as a conditioner every time I wash my hair. After leaving it in for three minutes you will definitely notice that your hair is much softer, and why the name of the product includes the word “miracle.”

    Last, but not least, the coconut oil. I’m sure by now you have heard about all the great uses and benefits of coconut oil, and for hair care it is no less. I use it as a deep conditioning mask once a week (if I’m being really good), or every other week. Basically I just scoop it out into my hands, rub it together to get it to melt a bit, and then rub it into my hair starting at the ends. After I coat my entire head, I wrap my hair into a loose bun on the top of my head and clip it down to secure it. I then cover it with a shower cap and go to sleep. In the morning I wash with the Renpure cleansing conditioner and follow up with the Aussie 3 minute miracle.

    *On a side note, I typically will wash/condition my hair no more than three times a week using the above process.

    Happy Hair-doing! 🙂 xo

    DIY Military Jacket

    The military look is pretty popular right now, and can be seen in varying degrees of detailing and embellishment from designer to designer. Obviously in most cases, the more detail, the higher the price tag. Ralph Lauren’s Denim and Supply line is one of my favorites right now. Intricate gold trim and velvety textures adorn many beautiful jackets and outerwear options. But for those of you on a budget or who just like to do-it-yourself, there is a simple and affordable alternative.

    First you’ll need your canvas. Here are a few options for jackets from Forever 21:

    Forever 21 – Cotton Utility Jacket

    Forever 21 – Buttoned Pocket Utility Jacket

    Forever 21 – Cotton Twill Jacket

    Once you’ve decided on a jacket, you’ll need to figure out what you want to decorate it with. Common things seen in many military style jackets are epaulettes, patchwork, gold and red trim, stars, eagles, flags, embroidery, etc.  The first thing I started with was the epaulettes (these will go on the shoulders of your jacket). There a several types, but for my jacket I went with red braided epaulettes (seen above). I bought mine off of eBay for approximately $4-$5. You can scroll through several types simply by searching “epaulettes” or clicking the link above.

    Next you’ll need some patches. Again, I went to eBay for these as well. I searched “military patches,” again you will have several pages to scroll through. I bought mine with the intention to place them on the arms of the jacket.

    Last (although I chose to skip it for my jacket) you may want to buy some gold star-shaped buttons for the front breast-pocket area of the jacket. These can be found at Jo-Ann’s, eBay, Michael’s or any other craft or sewing store you prefer.

    Once you have all your supplies you can begin the creative process. All the patches I bought were iron-on, so attaching them was super easy. The epaulettes were sewed by hand (also very easy) because they were slightly too thick for my sewing machine to handle. Or if you want the super-duper easy method, just buy some fabric glue and start gluing away until your little heart’s desire. *If using glue, just be aware of how your glue washes… dry-cleaning may be necessary to keep your jacket looking great.